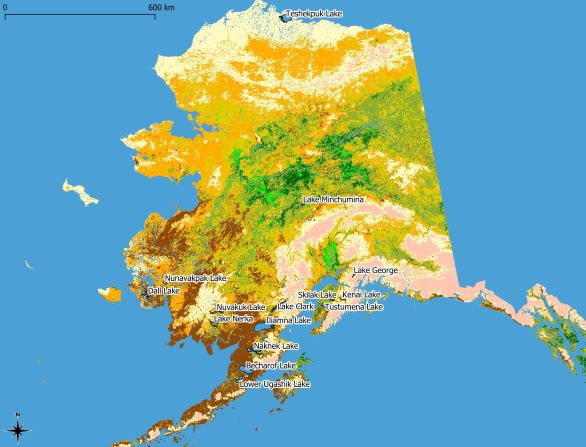
Alaska Lakes
- Start QGIS
- Click on Open Data Source Manager
- browse to qgis_sample_data/gml/ and double click qgis_sample_data/raster/landcover.img and double click qgis_sample_data/raster/lakes.gml
- Select the NAD27/Alaska Alberts entry
- Click OK
- Close the Data Source manager window
- Zoom to an area with lakes
- Double click the lakes layer in the map legend to open properties dialog
- To display the lake names reopen lakes layer properties dialog
- Click on the labels tab and choose the names field, then click apply
- Improve readibility with buffer tab
- To add map items go to view decorations scale bar menu
- Click project import export and export map to image
- Press Project save
PLSS System
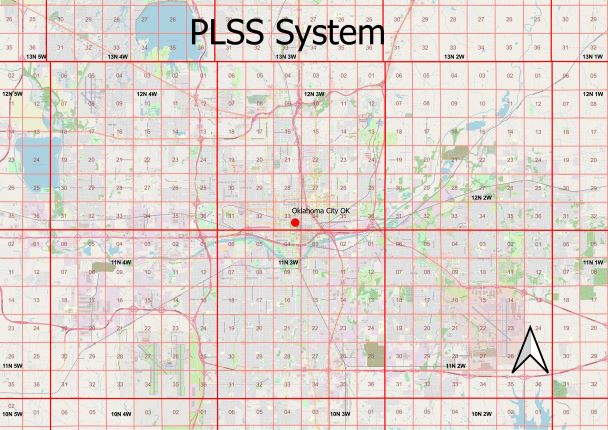
- Log on to ArcGIS Online
- Search for Plublic Land Survey System
- In overview page, go to bottom right, copy and paste the URL
- Start QGIS
- Navigate to Layer- Add Layer -> Add ArcGIS REST Server Layer
- From the Data Sources Manager, click on new, and Create a New ArcGIS REST Server Connection will come up.
- Paste the URL you copied from ArcGIS online, and click OK
- Click Connect
- Add Layers one by one to reduce downloading time
Google Earth Base Map
- Go to QGIS
- Select plugins, scroll to manage and install plugins.
- Type in HCMGIS
- Install Plugin
- Go to HCMGIS, scroll to basemaps
- This google sattelite hybrid, you can choose others
Tokyo,Japan area close up
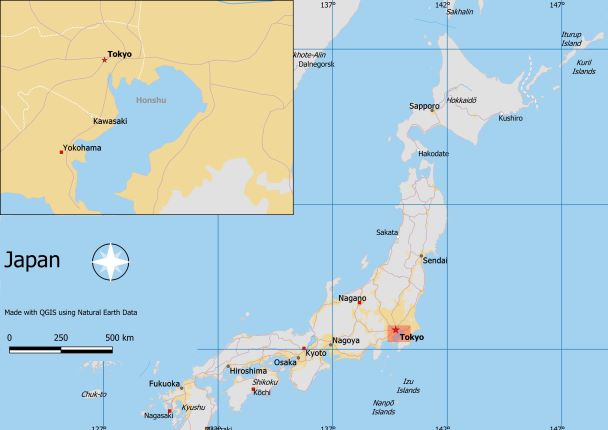
- Download and Natural Earth Quickstart Kit
- Labels maybe in a different language, go to variables by going to Project - Properties - Variables tab - locate project_language, change to name_en.
- Click Refresh
- Pan and zoom to japan
- Turn off layers that aren't needed. Expand z5 - 1:18m and uncheck ne_10m_geography_marine_polys and ne_admin_0_disputed_areas
- Make sure default CRS for the project is EPSG:3857 Pseudo-Mercator by
- Go to Project - New Print Layout. Leave title empty.
- Use zoom full button to display full extent of layout
- Go to Add Item - Add map
- Drag map onto the whole layout
- Zoom to level of map scale to 10000000
- Lock Layers and lock styles for layers by checking the boxes
- Turn off layer group z5 - 1:18m and ativate z7 - 1: 4m
- Go to Add item - Add Map
- Drag the new map at the upper left corner
- Select Map 2 and go to item properties tab. Go to Frame panel and check box.
- Go to item properties and click green plus sign to add a new overview
- Sect Map 2 as the Map Frame.
- Select Map 1 from Items panel, and go to Grids and click green plus sign to add a new grid.
- Click modify grid
- Click on CRS. Enter 4326 in the filter box. Select WGS84 EPSG:4326.
- Select interval values as 5 in X and Y.
- Scroll to Grid frame and check Draw coordiantes box. Click custom and then click the Expression button
- Enter this expression: concat(to_string(@grid_number), '° ')
- Adjust the position settings by clicking on Left, Right, Top, and Bottom.
- Go to Add item - Add Shape - Add Rectangle
- Change style to copy to the map background
- Add North Arrow to the map. Click Add Item - Add Picture.
- Draw a rectangle, and then click on Item Properties and then expand Search Directories and select the image
- Click on Add Item - Add Scalebar
- Click on the layout where you want the scale bar to appear. Choose a style by changing the fixed with to 200.
- Label map by clicking Add Item - Add Label
- Draw the label adjacent to the north arrow
- Export as image, PDF or SVG.
Neighborhood Walk

- Open QGIS
- Open plugins
- Go to manage and install plugins
- Search for GPX Segment Importer
- Select and press install plugin
- Look for the tool in Mange Layers toolbar or plugins - GPX importer
Digital Elevation Model
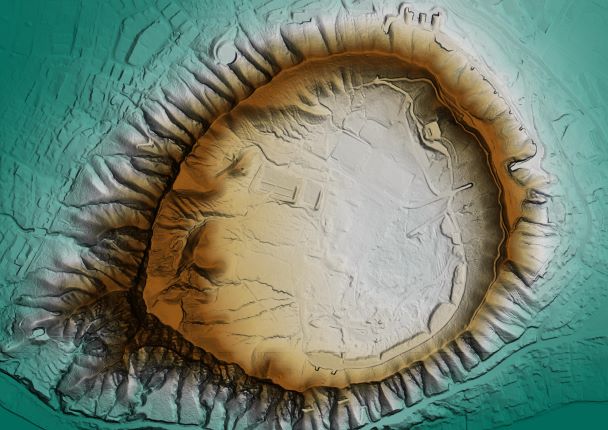
- Download DEM from NOAA Data Access Viewer
- Copy the original Layer
- Go to its properties
- Create Multidirectional hillshade
- Select render type as Hillshade
- Select Multi Directional
- Change under resampling on zoomed in to Bilinear and out to bilinear
- Select the original layer
- Select Reder type as Singleband pseudocolor
- Adjust min and max but standard is 15.7227 and 143.07 for this model
- Change color ramp to BrBG
- Invert colors if needed
- Change blending mode to multiply
- Change resampling on zoomed in to bilinear and bilinear on out. Select OK